Estimating the cost of a project and creating a budget that works for you and your client is practically an art. Clients want more for less, and you want more significant margins.
No matter what industry you’re in — one of the most critical parts of successful project management for any project manager is delivering on time, to scope, and within budget.
In this guide, you’ll learn about different cost estimation techniques and how to apply them to create accurate project cost estimates for your next client.
Let’s go!
What is cost estimating in project management?
Project cost estimating is the process of identifying the tasks, duration, and resources needed to complete the project. By accurately estimating the cost of a project, a business can better ensure that spending stays within budget once the project begins.
Note: your first cost estimate shouldn’t be the final price you hand over to a client — it should act as more of a ballpark on how much it might cost to deliver the project (more on this below).
Project estimate vs. budget
But what’s the difference between an estimate and a project budget? An estimate is what the cost of a project will be. Once the client approves this, it becomes a project’s budget. You will track expenses against this fee to generate a profit.
Types of estimates
Avoid selling a project at a fixed fee during the initial stages of the project.
You should follow a simple process of defining the overall project budget and creating different types of estimates before you sign off on a Statement of Work (SoW).
Consider creating the following estimates for your next client project:
- Ballpark estimate
- Budget estimate
- Statement of Work (SoW) estimate
Ballpark estimate
The client needs to know if the project is possible, but you need more information to give a proper estimate. So you can do this by giving them a ballpark estimate of how much the project will cost ($80k-$140k).
Budget estimate
Suppose the client is happy with the ballpark estimate. In that case, you may ask for more information about the project to put together a more accurate estimate and a project plan with an estimated timeline. Your revised estimate may change to $90k-$130k.
SoW estimate
Assuming the client is still good to go, the final step in the estimate refinement is pulling together the SoW, which will include the estimate and total project budget. You may adjust your estimate to $100k + a 20% contingency fund.
Techniques for estimating project costs
Below are a few cost estimating techniques you can use.
| Technique | Description |
|---|---|
| Analogous estimation | Looks at historical data to create a ballpark estimate |
| Top-down estimation | Looks at the overall scope and timeframe to create a high-level ballpark estimate |
| Parametric estimation | Combines data and variables to create a more accurate ballpark estimate |
| Three-point estimation | Combines the best-case scenario, the worst-case scenario, and the most likely scenario to get a realistic budget estimate |
| Bottom-up estimation | Breaks down the project into smaller tasks to create a more accurate estimate. Best for SoW estimates |
Analogous estimation
Analogous estimating involves looking at similar projects you’ve completed to create your estimate.
For example, a client may want a simple five-page website. You can look at the budget for similar website projects you’ve completed to create your estimate.
The issue with analogous estimates is that they tend to be slightly inaccurate.
They assume that:
- You have (accurate) historical data to reference
- There are no differences between projects,
But they are quick and easy and can be used with limited information to create a ballpark estimate — especially if you have historical data to hand (more on this later).
Top-down estimating
Top-down estimating looks at a high-level project budget and scope to create a ballpark estimate.
The initial project budget should come from the client, and it is your job to take their budget, slice it up, and allocate time/costs to phases or tasks in the project.
You then decide whether or not the client’s budget is enough to deliver the project. If not, you can ask the client to adjust the project scope to fit their budget better.
It is a form of analogous estimating, where existing knowledge of similar projects is used in the estimation process to produce a ballpark figure for the total cost.
Three-point estimating
Three-point estimating combines the best-case, worst-case, and most likely outcome scenarios to create an accurate, flexible estimate. This technique is particularly useful when the client has asked for a more detailed cost estimate.
How do you use this technique?
The best way is to break the project down into tasks and calculate an hourly estimate for each.
For example, you and your team may estimate the time to create a wireframe as follows:
- Best-case: 4 hours
- Worst-cate: 8 hours
- Most likely: 5 hours
Which gives you an estimated time of 5.6 hours.
The main advantage of three-point estimating is that it reduces risk — as you’re considering three different scenarios. But the downside is that it takes a bit of time!
Bottom-up estimation
Bottom-up estimating considers the time, cost, and effort for each task within the project. It then adds it up to create an estimation for the entire project.
This means it can be a super accurate technique if you’re at the point of creating a Statement of Work estimate.
The best way to use this technique is a tool called a Work Breakdown Structure (WBS).
This helps you break down a project into its tasks, which are then estimated separately and added to calculate the total project cost.
The advantage of the bottom-up estimating technique is that it’s the most accurate and, by being granular, enables precise tracking of a project’s progress against the estimate.
Note: we’ll explore how to use a WBS for estimating below!
Project costs to consider
A typical project estimate will be made up of the following components
- Tasks – what’s going to be done
- Resources – Who’s going to be doing it
- Duration – how long it will take
- Rate – how much will it cost to deliver the project
- Tools and software – what tools and software will be needed for the project
Note: remember to consider all direct costs (related to one specific project) and indirect costs (ongoing costs related to multiple projects).
How do you go about estimating the components above?
Let’s get into it!
How to estimate project costs in 8 steps
A typical cost estimation process can look like this:
- Rework their idea
- Consider conducting a project discovery
- Break down the project into phases and tasks
- Calculate the cost for each task
- Identify if you have enough resources to complete the project
- Calculate the total cost of the project
- Add a project buffer to protect profits
- Account for hidden costs
Note: The steps below will focus on creating an SoW estimate while touching on the steps you need to complete to create ballpark and budget estimates.
1. Rework their idea
Most clients won’t fully understand what they want from a project initially. It may be a basic concept, an end deliverable, or a simple idea.
It’s your job to rework their idea and turn it into a viable solution you can deliver within their budget.
But say the client wants to know how much it will cost before committing to working with you.
What do you do?
Get clarity on what you’re doing, why, and how. Rework their idea into a viable solution that matches their budget and timeline and delivers on their goals and objectives so that it delivers results.
The basics you need to go over are:
- Client needs – what problems are they facing? How do they expect the project to solve them
- Client expectations – What does success look like to the client? What do the deliverables look like?
- Client budget – What’s their budget, and what do they want/need to get done for that budget?
Your goal here is to shape their idea into a clear list of deliverables — so that you can articulate what the project is, how it works and how you will deliver it.
Unless you have a solid understanding of what needs to be delivered, you should use the top-down or analogous estimate technique to provide a rough ballpark estimate here. You don’t want to do too much leg work if the client doesn’t have the budget.
You can either use your experience here or use data from past similar projects to give a rough estimate.
If you’re using Toggl Track, you can access the financial data of past projects within the Project Dashboard.

This will show you earnings for flat rate and hourly billed projects.
2. Consider conducting a project discovery
Gathering all project requirements (or as much as possible) during a project discovery isn’t just essential — it’s one of the most crucial elements in your project lifecycle.
What is a project discovery?
A project discovery is a process that takes place before kicking off a project. It is focused on collecting detailed project requirements to identify goals, stakeholders, deliverables, costs, and budgets.
It will help you to create a far more accurate cost estimate.
But when do you carry out a project discovery?
This will depend on the project’s complexity and how much information you collected during your project intake process. A project discovery could be an initial 30-minute phone call, and that’s all you need to estimate the project’s cost. If that’s the case, you’ll probably not charge for that.
But the best-case scenario would be to
- Sell your project with a variable price range
- Carry out a project discovery
- Re-estimate and refine project scope post-discovery
- Sell each project phase/sprint at a flat rate
If not, you can
- Sell a discovery at a flat rate before you commit to the project
- Sell the rest of the project based on your findings
Try to avoid selling an entire project for one fixed price. You should do this only if you’ve done the project a thousand times before and know exactly what kind of effort is involved.
3. Break down the project into phases and tasks
Once you have a solid understanding of what work is required to deliver the project, and the client is happy to move forward with your ballpark estimate, it’s time to create a more accurate estimate.
You can use either the three-point estimation or the bottom-up technique here. But your goal is to break down the project so you can isolate parts of the deliverables and estimate their costs separately.
The best way to do this is to use a Work Breakdown Structure.
The purpose of creating a WBS is to help organize, visualize, and manage projects more efficiently. It serves as a framework for detailed cost estimation and control and can help you build an estimated project timeline. Adding a project buffer is smart, too! (more on this later).
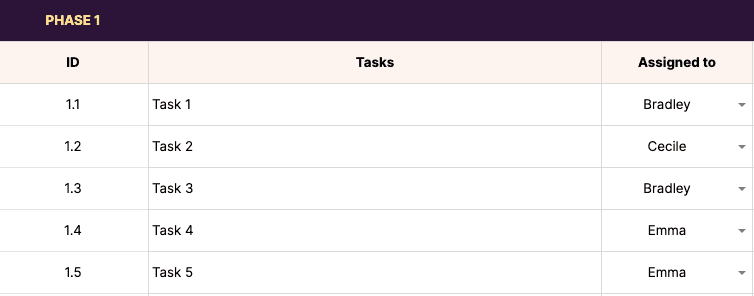
Feel free to use our WBS template below. The template contains fields to enter each task’s estimated hours and costs. Once filled out, this will create an estimated cost estimate for the entire project.
4. Calculate the cost for each task
Now that you know which tasks you need to complete, you can begin assigning time estimates to each.
Use the WBS template to fill out the estimates here. Hand the file to your team to use their knowledge and experience to add more accurate time estimates for each task.
Once a time estimate has been added for each task, a cost estimate will be generated based on your hourly rate.
We’ve added a formula to the template to speed up this part. 😊

By splitting the project into individual phases and tasks, you’ll better understand how the project fits together to form the whole. And when divided into smaller parts, it also makes it much easier for your team to estimate how much effort will be required to produce it.
When it comes to tracking project costs, you will be able to track expenditures against specific project phases rather than lump them all together.
But this process can take time, so don’t do this for a ballpark estimate. It makes more sense to do this when you know the client has the budget and needs more detail from you.
You can provide budget estimates faster if you’re experienced with the type of work or have access to past project estimates.
Using Toggl Track, you can view past project task data within the Reports Dashboard to better understand what time and costs went into each task.
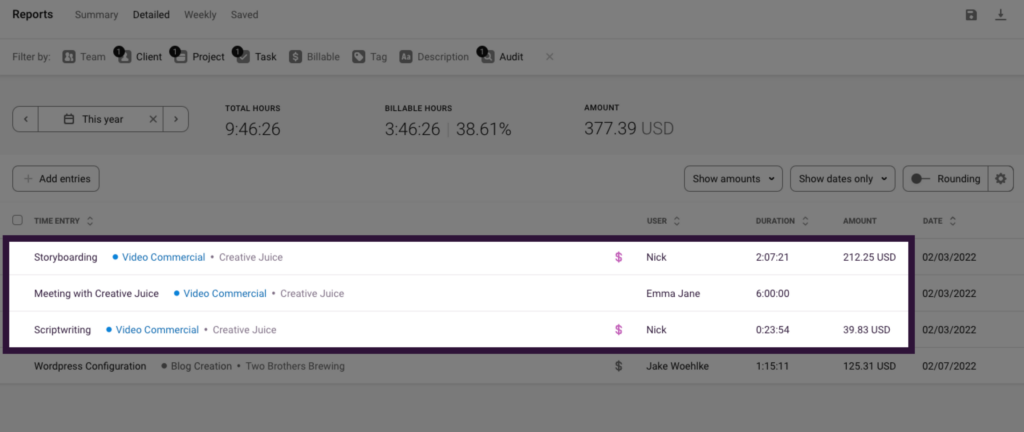
This is useful for quickly coming up with a budget estimate for a project when the client wants a little more detail.
It’s worth noting that project cost estimates often need to be adjusted during the discovery phase — especially on long and complicated projects.
But using a WBS and past historical project data should help you to create far more accurate cost estimates.
5. Identify if you have enough resources to complete the project
After estimating how many hours you’ll need for each task, consider internal team capacity. Your team probably has multiple projects on the go already, so you’ll need to ensure they have time to accommodate the incoming work.
To estimate team capacity, consider
- How many hours each team member works per day
- How many billable hours per day each team member is racking up (billable utilization)
- Planned vacations and holidays
- Unexpected circumstances — such as sick leave
From speaking with many agencies, we know capacity planning is a big issue. So don’t skim over this step.
Not knowing if you can manage projects can lead to many issues. Such as scope creep, profits taking a hit, and project timelines being pushed back constantly.
There are plenty of capacity planning tools out there. But if you’re using Toggl Plan, you quickly view your team’s capacity using Team Timelines.
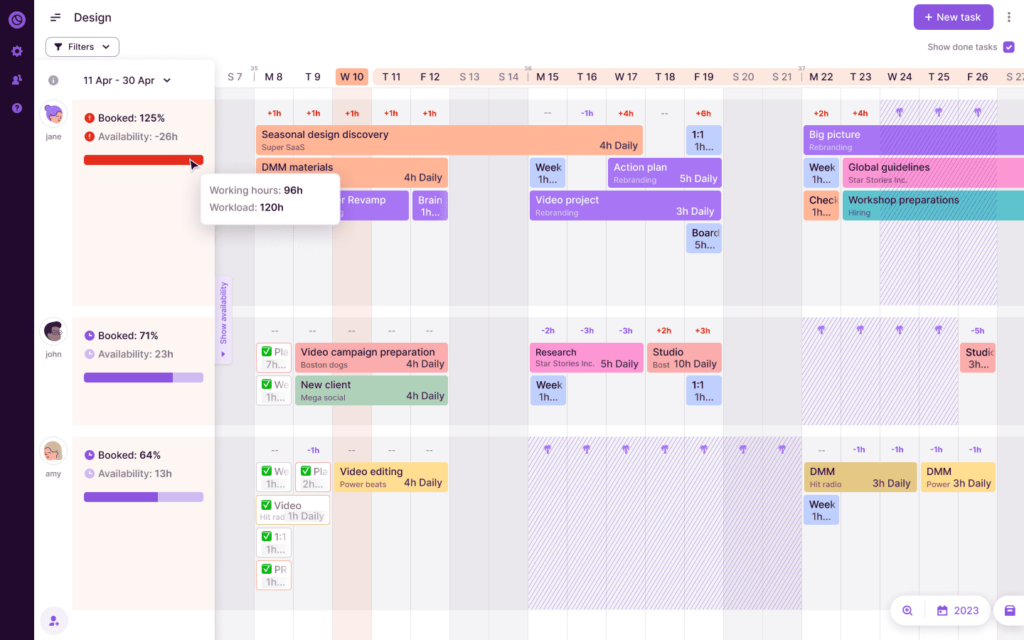
Team timelines give you the best visual overview of who’s working on what and when.
That way, you can see at a glance what everyone is working on, make sure that no one is overloaded, and notice when there’s room for new projects.
Check out this page to learn more 👉 Resource Planning with Toggl Plan.
6. Calculate the total cost of the project
Finally, it’s time to calculate the project’s total estimated cost.
If you’ve used the WBS template mentioned above, you may have something like the example below.
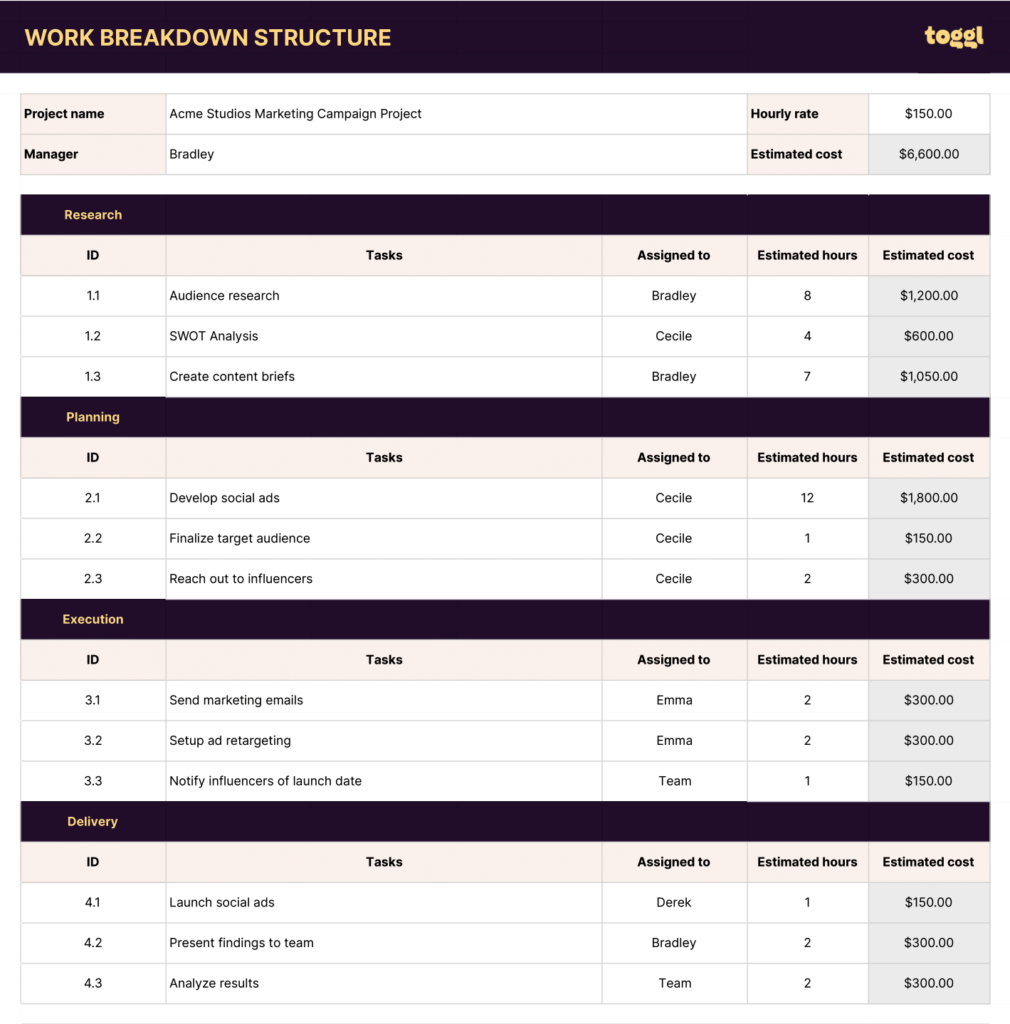
You can use the project’s total estimated cost as part of your budget or SoW estimate and send it straight off to the client for feedback.
But first, you may want to consider adding a project buffer…
7. Add a project buffer to protect profits
Agreeing on the cost of a project is the easiest part — but trying to keep that project within budget?
It’s almost impossible to avoid hiccups throughout the lifecycle of a project.
Prevention is key here.
The easiest solution to avoid project profitability tanking is to mitigate project risks is to add a bit of a buffer to your project cost estimates — at the task, phase, or project level.
Adding this will help account for anything that could go wrong within the project. It will be a much-appreciated cushion for minor issues and sudden changes.
Projects tend to go over budget for several reasons.
- Additional client requests
- Sudden changes from the client
- Poor project planning
- Goals and objectives are constantly changing
Note: check out our guide ‘How to Create and Manage a Project Budget’ to learn more about how to address each issue above.
How much of a project buffer should you add?
Experts recommend adding about 10% – 30% to your project estimate. Check out the video below for more tips on this.
The better solution to adding buffers to your project cost estimates is to mitigate the impact of risk by estimating for it upfront. This can be done by adding a 20% contingency fund to your estimate to account for change and risk.
Don’t build this into your estimate, but add it as a separate line item. This helps set a precedent and educates your client that changes to scope equate to additional costs from the contingency fund.
This means you can say yes to your clients a lot more, with a small caveat that you’ll be using the additional budget for it.
8. Account for hidden costs
Before you wrap up your estimate, ensure you include a project’s hidden costs. With any project, there’s the cost of delivering the main project. But expenses associated with providing the project must be accounted for, or your profitability gets obliterated.
Here are some of the things to think about.
Project and account management time
The most significant drain on project costs is the time you spend managing the project and the account.
Try adding at most 25% to the project estimate for this. The amount of time you spend on project and account management will vary from project to project. So be realistic and remember that clients want to pay for the work being done.
Do you want to understand better how much time you spend managing projects?
Tracking time is your best option here. This can be done for billable and non-billable tasks. That way, you will better understand what resources go into each project.
For example, you may spend a lot of time in meetings with a client discussing the project. If so, you should be tracking this as your project management time!
Using Toggl Track, you can start tracking your time in just a few clicks.
This will help you better determine how much time you spend on project and account management, allowing you to estimate the cost of future projects more accurately.
Scoping time
Remember the time it takes to initiate a project. Think about how and where you will include costs for the effort at the start of the project, pulling together timelines, gathering and compiling project requirements, and putting together the scope of work documentation.
Don’t bury this in with your estimate — get the client to pay for this as part of an initial discovery phase, or include it in your total estimate as a separate item.
3rd party costs
Finally, don’t forget the 3rd party costs. What other stuff will you need to pay to deliver the project?
This may include equipment rental, hosting, subscriptions, translations, photography, fonts, licensing, and more.
And if you’re working with clients in a different city, don’t forget about travel and subsistence and your travel time; who’s paying for the team’s time when they can’t work on other projects?
Making sure you account for these costs is critical to ensuring you don’t ruin your profitability.
Project cost estimate example
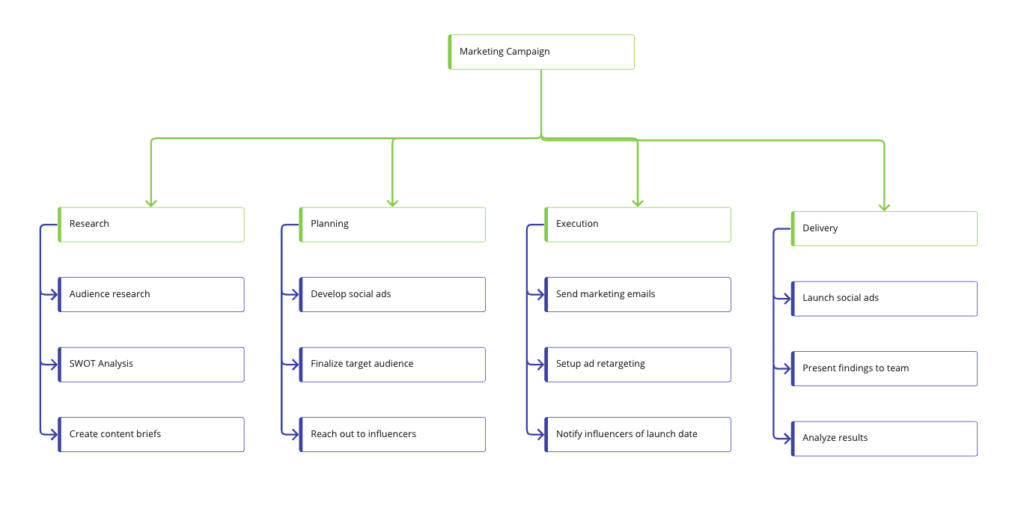
Let’s use a marketing campaign project as an example for a more simple explanation of how to estimate project costs.
Using a phase-based approach, your high-level WBS may look like the image below.
Next, you would use the bottom-up estimation technique and calculate how long these tasks will take and determine how much they’ll cost.
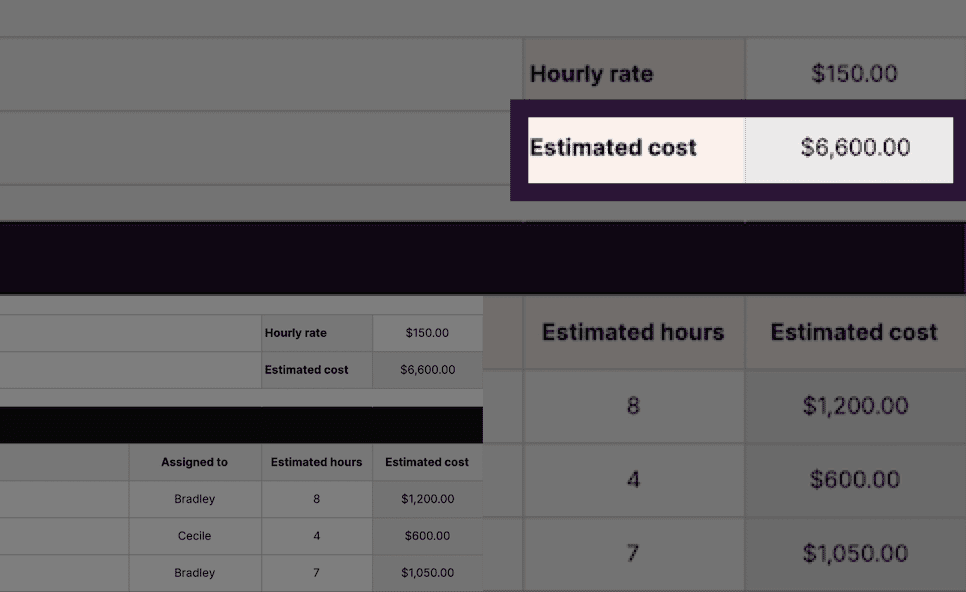
Note: by adding time estimates, the WBS can also act as the foundation for your project timeline —perfect for your detailed project proposal.
If you can gather historical data and automate parts of the process for consistency, this will make project costing easier and more accurate.
Step up your project cost estimation game
Hopefully, this guide has helped you understand when and how to create different project cost estimates.
Accurate project estimation is the make or break of your entire project’s outcome.
Yet, for many businesses, proper project estimating is often overlooked.
Start fine-tuning your project estimation process to help you avoid missed deadlines and improve your margins while drinking up pure, unfiltered success.

More resources
- How to Create and Manage a Project Budget
- Work Breakdown Structure: A Guide For Agencies
- Project Estimation Techniques: A PM’s Handbook
Bonus resources
- When Client Says “Your Price Is Too High”– How To Respond Role Play By The Futur
- How do you Estimate the Cost of a Project? By The Futur
Sean is a Content Marketer at Toggl. He's been involved in SEO and Content Marketing since 2017. Before working for Toggl, Sean ran SEO at a digital marketing agency—so he's all too familiar with time tracking and project management.

![6 Key Project Estimation Techniques to Know [2023]](images/blog-header-pms-handbook_blog-header-1640x982-2-112x67.png)


![How to Calculate Project ROI [Steps, Formula, Example]](images/calculate-project-roi-673x404.jpg)
![What is Resource Smoothing in Project Management? [Guide]](images/resource-leveling-673x404-2.jpg)